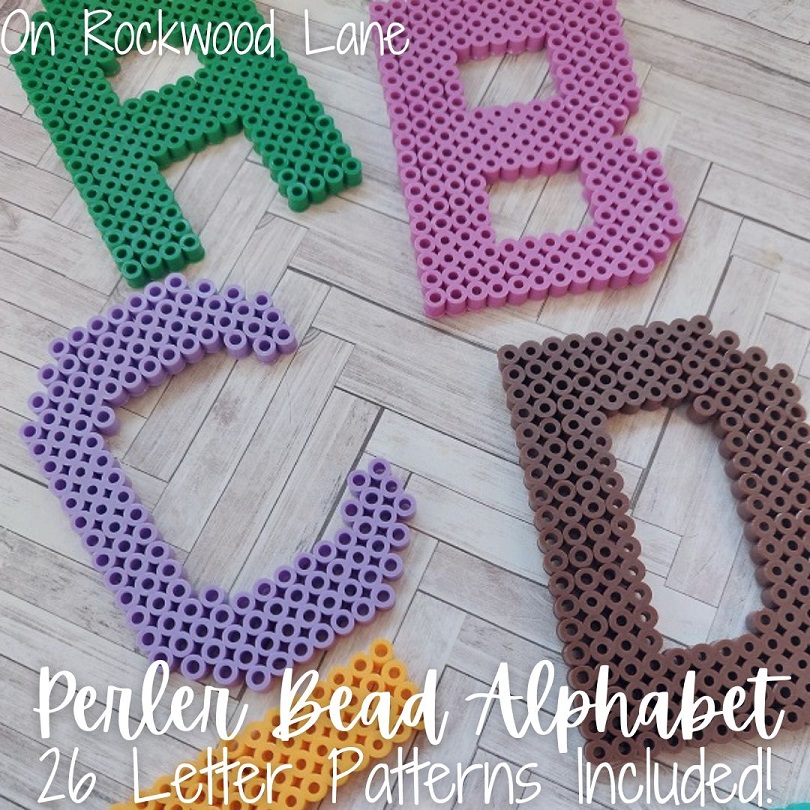
This is a free pattern and video tutorials showing how to make Perler bead letters. Perfect for an array of DIY projects, or string up as an ornament or gift tag.
This post contains affiliate links for Amazon. If you make a purchase by clicking on them, I make a small commission at no extra cost to you. Thanks for your support!
Find the free pattern and instructions below, or purchase a printer-friendly, ad-free PDF on Etsy by clicking here.
In a hurry? Pin it for later when you have some more time.
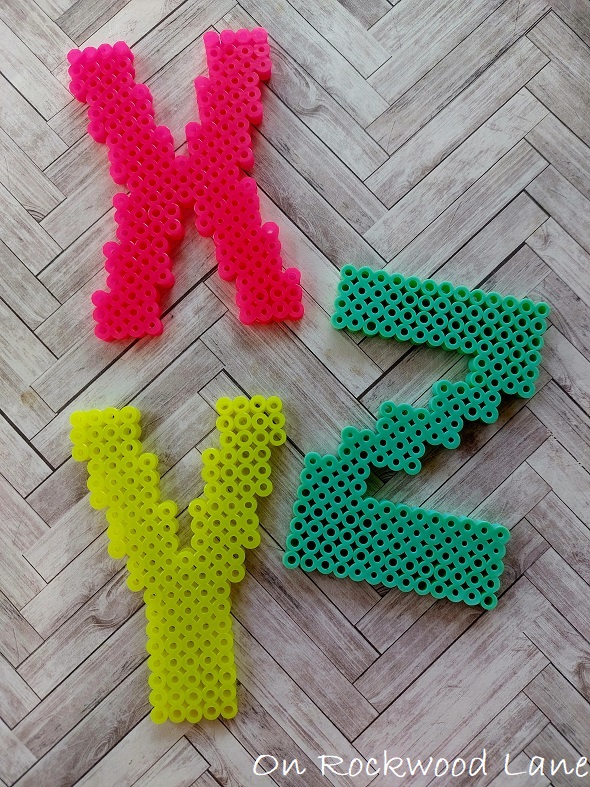
I have been wanting to try Perler beads for a while now. Recently, I went to JoAnn Fabrics to return some yarn, and while I was there, I picked up an assortment of beads and pegboards.
I was thinking some letter ornaments would be a great addition to my booth at America’s Antique Mall in Melbourne, Florida (ask for seller ELK, that’s me!), but these letters are really great for such a variety of projects. You can glue them to things, string them up to create a garland, hang them as an ornament or gift tag.
I still have some perfecting of the ironing technique before I feel comfortable selling any creations, but I had so much fun with these letters, I can’t wait to start on projects with them! I will happily use them in DIYs for my home decor.
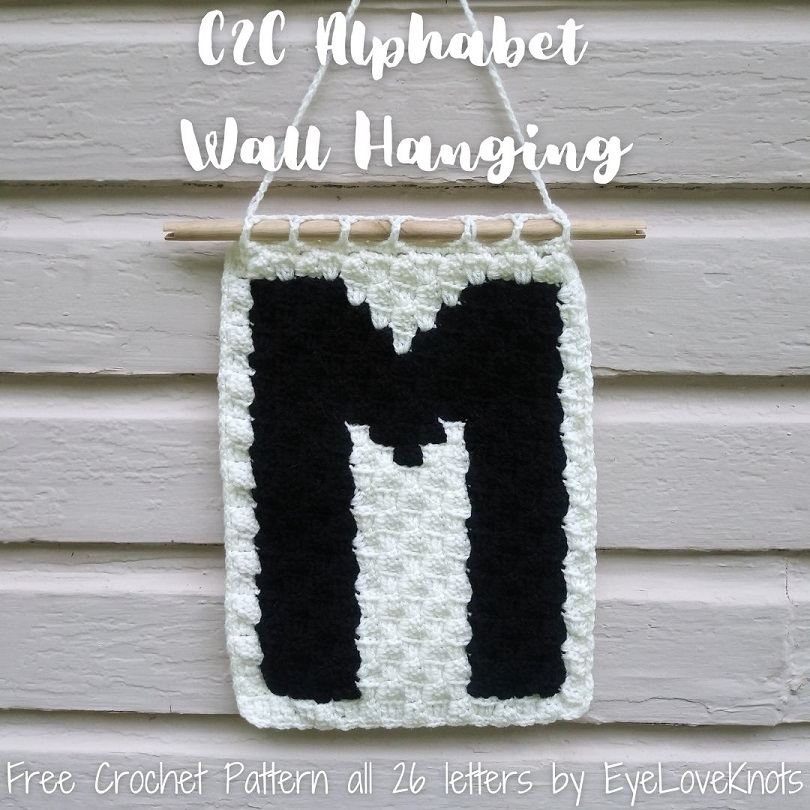
Do you crochet? Maybe you’d like to try out my C2C Alphabet Wall Hanging, or 18″ C2C Alphabet Afghan Square? There are free crochet patterns on my sister blog, EyeLoveKnots.
How Do I Fuse the Beads Together?
After all the beads are set and on an iron-safe surface, place parchment paper on top (waxiest side face down), and iron in a circular motion for 15 – 20 seconds, or as needed to fuse all beads. Flip over (be careful, may be hot), replace parchment paper, and iron in a circular motion for 15 – 20 seconds, or as needed to fuse all beads. Peel off paper, and allow to cool. As it cools, it will become more sturdy.
The original instructions state to use medium heat. My iron has a knob for heat settings of 1 – 6 depending on the fiber ironing. I tried on medium, but it took way too long to fuse, and then the beads fused unevenly, so I turned it up to 6, and it worked for me in the 15 – 20 second timeframe.
Ad-Free, Printer Friendly PDF:
If you would like a PDF version of this post, you may get one through my On Rockwood Lane Etsy Shop for a small fee. This fee is to compensate for the views lost when you no longer need to return to the blog to for the information, as you will have your own copy. Plus! It helps fund supplies for new projects to share with you!
Shop EyeLoveKnots Etsy: Perler Bead Alphabet.
Save This To Your Favorites (sub 07/05/23) – FaveCrafts, AllFreeHolidayCrafts, Cheap Thrifty Living, DIY Idea Center
In a hurry? Pin it for later when you have some more time.
What Supplies Do I Need to Make Perler Bead Letters?
- 123 – 188 Perler Beads (check under each graph for specific number)
- Pegboard that is at least 4″
- Tweezers – picked up mine at Dollar Tree
- Parchment Paper
- Iron – I love my Black and Decker one
- Ironing Mat (or use an ironing board)
Material Notes:
I keep my Perler Beads stored in a plastic jewelry container with compartments, but I think separate containers would be more helpful.
I like to use the 5.75″ (5 3/4″) pegboards that come with the puzzle piece edges so they can be interlocked. I keep them separated, but then am able to set 4 letters at a time, and then go to my ironing station, and fuse them.
Parchment paper can be used over, and over again. If you buy a set of pegboards, or assortment of beads, like this one I got, it will come with a sheet of parchment paper so you won’t even need to buy extra.
Time Spent:
I didn’t time myself, but I’d say 10-20 minutes each.
Measurements:
2.5″ (2 1/2″) Wide by 5.38″ (5 3/8″) Tall
All the letters follow the same sizing so they match. At the widest point, the letter is 13 beads, and at the tallest point, the letter is 19 beads.
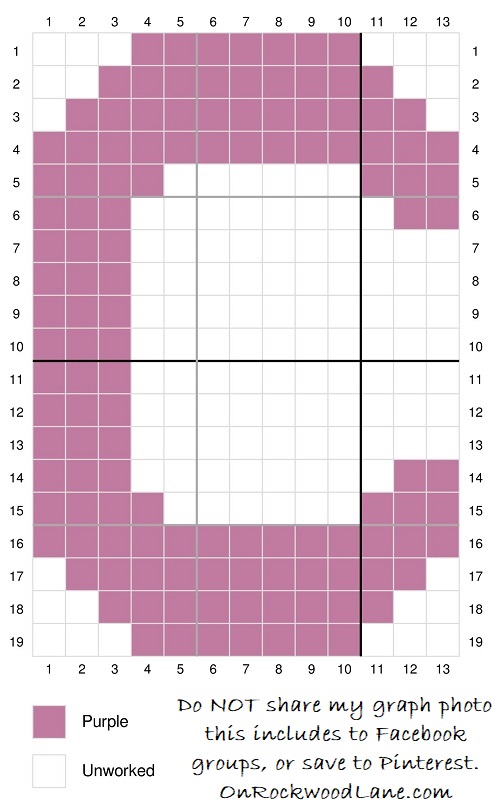
“A” Graph:
As a blogger, I rely on views to my blog to earn money from my ads. Please do NOT share my graph photo this includes in Facebook groups, or save to Pinterest. Doing so, would allow makers to not have to return to my blog, which would result in a loss of views and income.
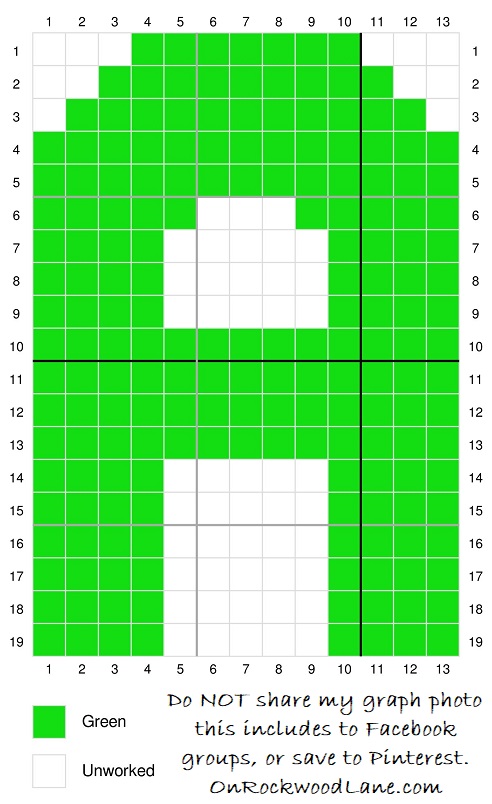
You’ll need 187 beads for this Letter A.
After letter is set, place parchment paper on top (waxiest side face down), and iron in a circular motion for 15-20 seconds, or as needed to fuse all beads. Flip over (be careful, may be hot), replace parchment paper, and iron in a circular motion for 15-20 seconds, or as needed to fuse all beads. Peel off paper, and allow to cool.
“A” Video Tutorial:
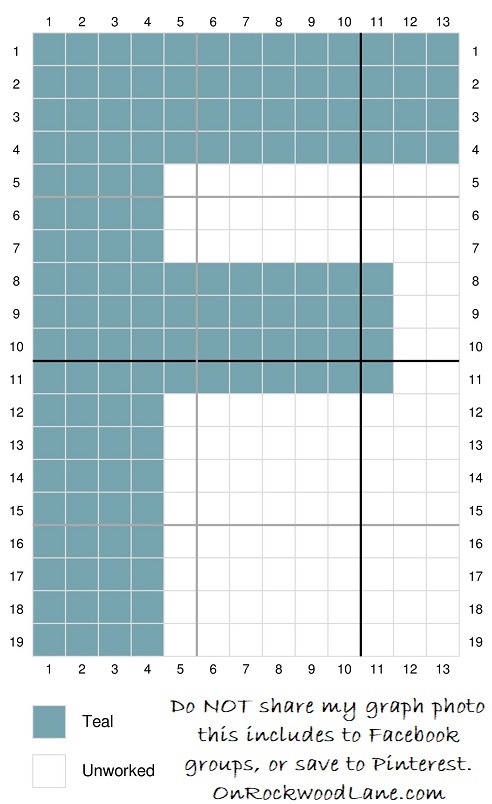
“B” Graph:
As a blogger, I rely on views to my blog to earn money from my ads. Please do NOT share my graph photo this includes in Facebook groups, or save to Pinterest. Doing so, would allow makers to not have to return to my blog, which would result in a loss of views and income.
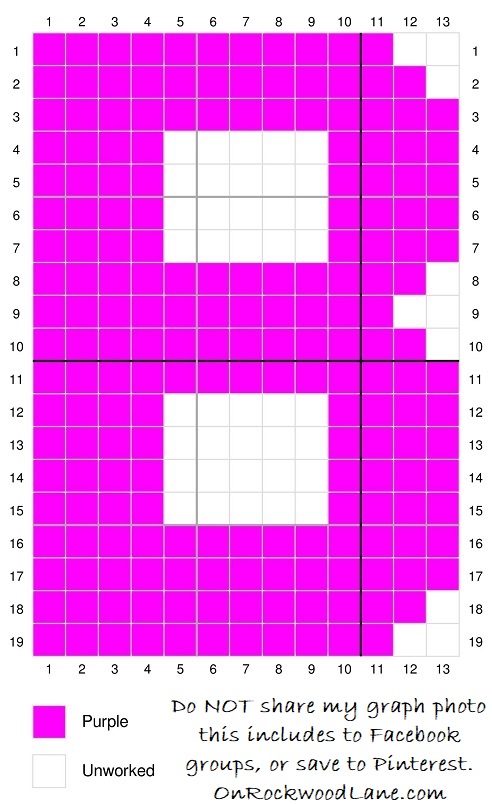
You’ll need 197 beads for this Letter B.
After letter is set, place parchment paper on top (waxiest side face down), and iron in a circular motion for 15-20 seconds, or as needed to fuse all beads. Flip over (be careful, may be hot), replace parchment paper, and iron in a circular motion for 15-20 seconds, or as needed to fuse all beads. Peel off paper, and allow to cool.
“B” Video Tutorial:
“C” Graph:
As a blogger, I rely on views to my blog to earn money from my ads. Please do NOT share my graph photo this includes in Facebook groups, or save to Pinterest. Doing so, would allow makers to not have to return to my blog, which would result in a loss of views and income.
You’ll need 117 beads for this Letter C.
After letter is set, place parchment paper on top (waxiest side face down), and iron in a circular motion for 15-20 seconds, or as needed to fuse all beads. Flip over (be careful, may be hot), replace parchment paper, and iron in a circular motion for 15-20 seconds, or as needed to fuse all beads. Peel off paper, and allow to cool.
“C” Video Tutorial:
“D” Graph:
As a blogger, I rely on views to my blog to earn money from my ads. Please do NOT share my graph photo this includes in Facebook groups, or save to Pinterest. Doing so, would allow makers to not have to return to my blog, which would result in a loss of views and income.

You’ll need 182 beads for this Letter D.
After letter is set, place parchment paper on top (waxiest side face down), and iron in a circular motion for 15-20 seconds, or as needed to fuse all beads. Flip over (be careful, may be hot), replace parchment paper, and iron in a circular motion for 15-20 seconds, or as needed to fuse all beads. Peel off paper, and allow to cool.
“D” Video Tutorial:
“E” Graph:
As a blogger, I rely on views to my blog to earn money from my ads. Please do NOT share my graph photo this includes in Facebook groups, or save to Pinterest. Doing so, would allow makers to not have to return to my blog, which would result in a loss of views and income.

You’ll need 176 beads for this Letter E.
After letter is set, place parchment paper on top (waxiest side face down), and iron in a circular motion for 15-20 seconds, or as needed to fuse all beads. Flip over (be careful, may be hot), replace parchment paper, and iron in a circular motion for 15-20 seconds, or as needed to fuse all beads. Peel off paper, and allow to cool.
“E” Video Tutorial:
“F” Graph:
As a blogger, I rely on views to my blog to earn money from my ads. Please do NOT share my graph photo this includes in Facebook groups, or save to Pinterest. Doing so, would allow makers to not have to return to my blog, which would result in a loss of views and income.
You’ll need 140 beads for this Letter F.
After letter is set, place parchment paper on top (waxiest side face down), and iron in a circular motion for 15-20 seconds, or as needed to fuse all beads. Flip over (be careful, may be hot), replace parchment paper, and iron in a circular motion for 15-20 seconds, or as needed to fuse all beads. Peel off paper, and allow to cool.
“F” Video Tutorial:
“G” Graph:
As a blogger, I rely on views to my blog to earn money from my ads. Please do NOT share my graph photo this includes in Facebook groups, or save to Pinterest. Doing so, would allow makers to not have to return to my blog, which would result in a loss of views and income.
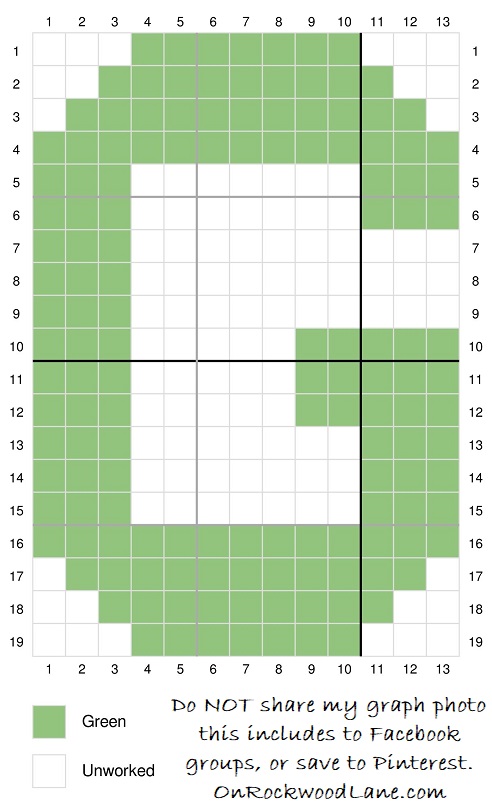
You’ll need 143 beads for this Letter G.
After letter is set, place parchment paper on top (waxiest side face down), and iron in a circular motion for 15-20 seconds, or as needed to fuse all beads. Flip over (be careful, may be hot), replace parchment paper, and iron in a circular motion for 15-20 seconds, or as needed to fuse all beads. Peel off paper, and allow to cool.
“G” Video Tutorial:
“H” Graph:
As a blogger, I rely on views to my blog to earn money from my ads. Please do NOT share my graph photo this includes in Facebook groups, or save to Pinterest. Doing so, would allow makers to not have to return to my blog, which would result in a loss of views and income.
You’ll need 177 beads for this Letter H.
After letter is set, place parchment paper on top (waxiest side face down), and iron in a circular motion for 15-20 seconds, or as needed to fuse all beads. Flip over (be careful, may be hot), replace parchment paper, and iron in a circular motion for 15-20 seconds, or as needed to fuse all beads. Peel off paper, and allow to cool.
“H” Video Tutorial:
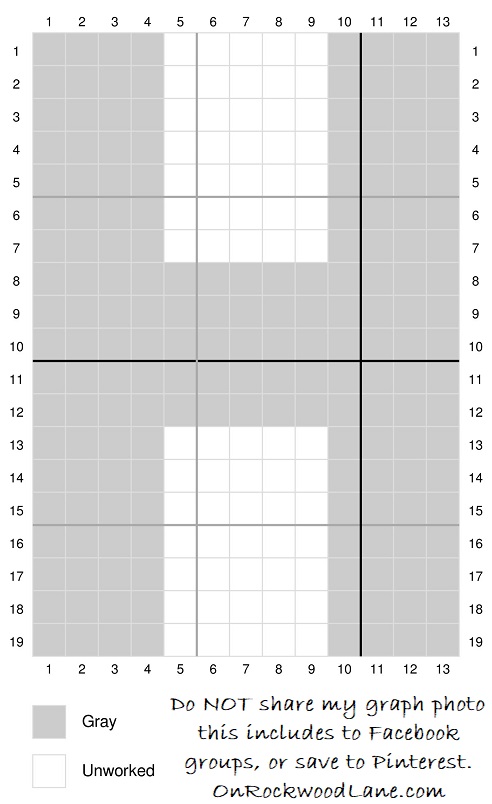
“I” Graph:
As a blogger, I rely on views to my blog to earn money from my ads. Please do NOT share my graph photo this includes in Facebook groups, or save to Pinterest. Doing so, would allow makers to not have to return to my blog, which would result in a loss of views and income.
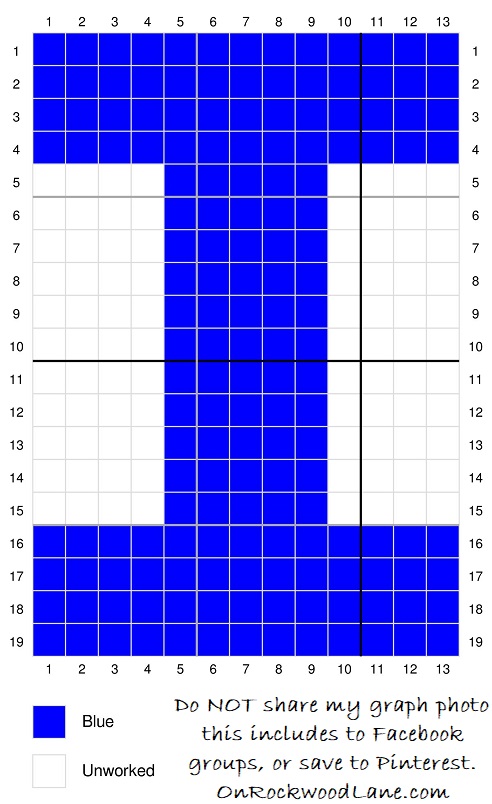
You’ll need 159 beads for this Letter I.
After letter is set, place parchment paper on top (waxiest side face down), and iron in a circular motion for 15-20 seconds, or as needed to fuse all beads. Flip over (be careful, may be hot), replace parchment paper, and iron in a circular motion for 15-20 seconds, or as needed to fuse all beads. Peel off paper, and allow to cool.
“I” Video Tutorial:
“J” Graph:
As a blogger, I rely on views to my blog to earn money from my ads. Please do NOT share my graph photo this includes in Facebook groups, or save to Pinterest. Doing so, would allow makers to not have to return to my blog, which would result in a loss of views and income.

You’ll need 112 beads for this Letter J.
After letter is set, place parchment paper on top (waxiest side face down), and iron in a circular motion for 15-20 seconds, or as needed to fuse all beads. Flip over (be careful, may be hot), replace parchment paper, and iron in a circular motion for 15-20 seconds, or as needed to fuse all beads. Peel off paper, and allow to cool.
“J” Video Tutorial:
“K” Graph:
As a blogger, I rely on views to my blog to earn money from my ads. Please do NOT share my graph photo this includes in Facebook groups, or save to Pinterest. Doing so, would allow makers to not have to return to my blog, which would result in a loss of views and income.
You’ll need 159 beads for this Letter K.
After letter is set, place parchment paper on top (waxiest side face down), and iron in a circular motion for 15-20 seconds, or as needed to fuse all beads. Flip over (be careful, may be hot), replace parchment paper, and iron in a circular motion for 15-20 seconds, or as needed to fuse all beads. Peel off paper, and allow to cool.
“K” Video Tutorial:
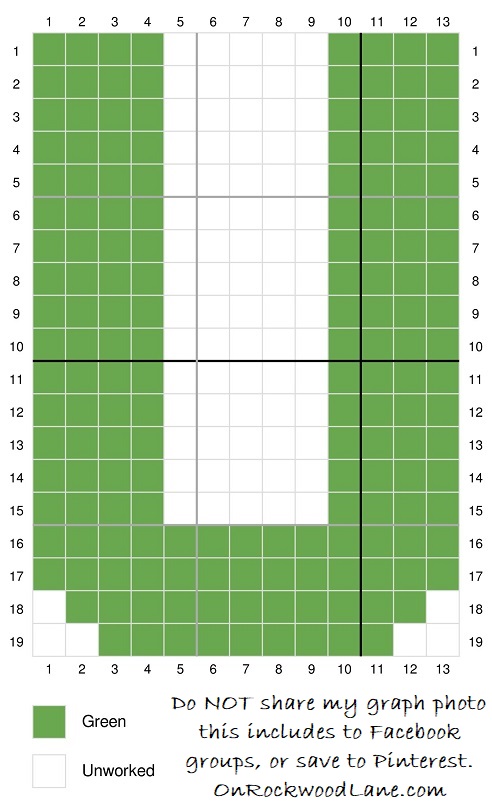
“L” Graph:
As a blogger, I rely on views to my blog to earn money from my ads. Please do NOT share my graph photo this includes in Facebook groups, or save to Pinterest. Doing so, would allow makers to not have to return to my blog, which would result in a loss of views and income.

You’ll need 112 beads for this Letter L.
After letter is set, place parchment paper on top (waxiest side face down), and iron in a circular motion for 15-20 seconds, or as needed to fuse all beads. Flip over (be careful, may be hot), replace parchment paper, and iron in a circular motion for 15-20 seconds, or as needed to fuse all beads. Peel off paper, and allow to cool.
“L” Video Tutorial:
“M” Graph:
As a blogger, I rely on views to my blog to earn money from my ads. Please do NOT share my graph photo this includes in Facebook groups, or save to Pinterest. Doing so, would allow makers to not have to return to my blog, which would result in a loss of views and income.

You’ll need 177 beads for this Letter M.
After letter is set, place parchment paper on top (waxiest side face down), and iron in a circular motion for 15-20 seconds, or as needed to fuse all beads. Flip over (be careful, may be hot), replace parchment paper, and iron in a circular motion for 15-20 seconds, or as needed to fuse all beads. Peel off paper, and allow to cool.
“M” Video Tutorial:
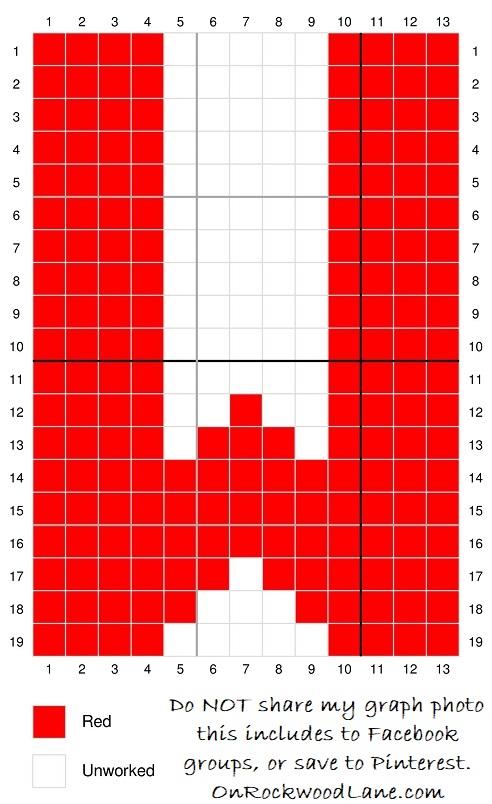
“N” Graph:
As a blogger, I rely on views to my blog to earn money from my ads. Please do NOT share my graph photo this includes in Facebook groups, or save to Pinterest. Doing so, would allow makers to not have to return to my blog, which would result in a loss of views and income.
You’ll need 182 beads for this Letter N.
After letter is set, place parchment paper on top (waxiest side face down), and iron in a circular motion for 15-20 seconds, or as needed to fuse all beads. Flip over (be careful, may be hot), replace parchment paper, and iron in a circular motion for 15-20 seconds, or as needed to fuse all beads. Peel off paper, and allow to cool.
“N” Video Tutorial:
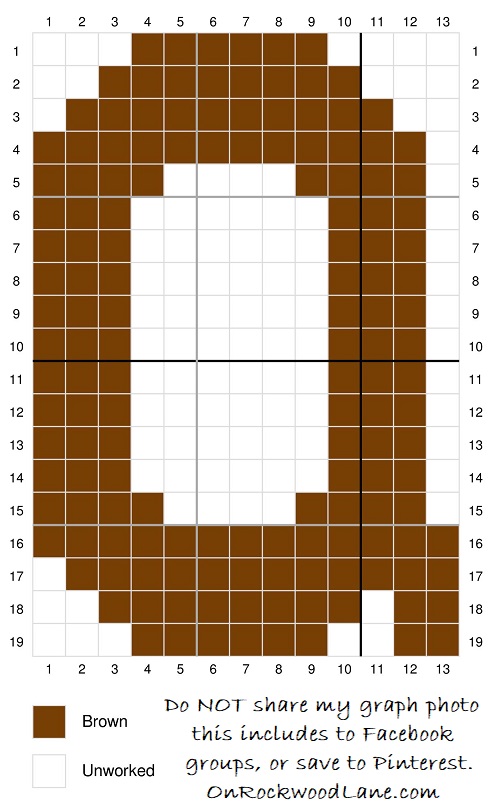
“O” Graph:
As a blogger, I rely on views to my blog to earn money from my ads. Please do NOT share my graph photo this includes in Facebook groups, or save to Pinterest. Doing so, would allow makers to not have to return to my blog, which would result in a loss of views and income.

You’ll need 150 beads for this Letter O.
After letter is set, place parchment paper on top (waxiest side face down), and iron in a circular motion for 15-20 seconds, or as needed to fuse all beads. Flip over (be careful, may be hot), replace parchment paper, and iron in a circular motion for 15-20 seconds, or as needed to fuse all beads. Peel off paper, and allow to cool.
“O” Video Tutorial:
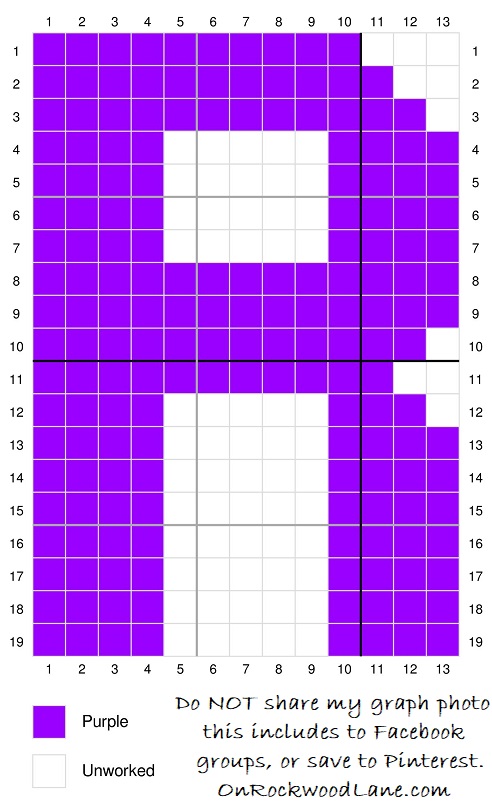
“P” Graph:
As a blogger, I rely on views to my blog to earn money from my ads. Please do NOT share my graph photo this includes in Facebook groups, or save to Pinterest. Doing so, would allow makers to not have to return to my blog, which would result in a loss of views and income.
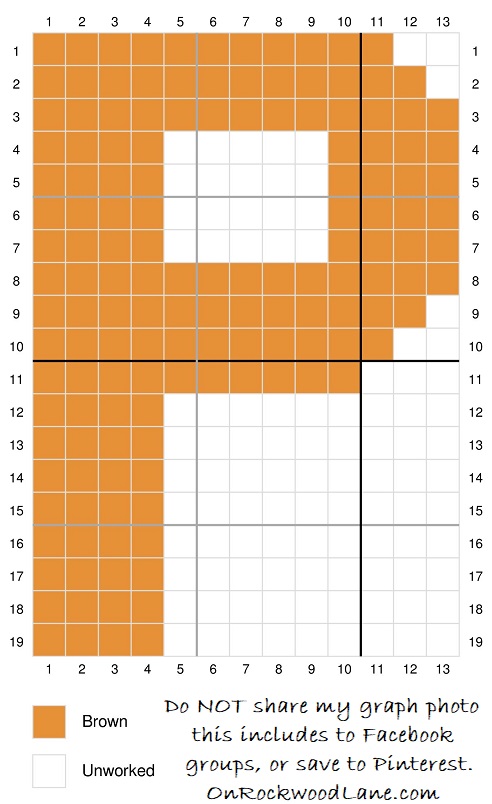
You’ll need 146 beads for this Letter P.
After letter is set, place parchment paper on top (waxiest side face down), and iron in a circular motion for 15-20 seconds, or as needed to fuse all beads. Flip over (be careful, may be hot), replace parchment paper, and iron in a circular motion for 15-20 seconds, or as needed to fuse all beads. Peel off paper, and allow to cool.
“P” Video Tutorial:
“Q” Graph:
As a blogger, I rely on views to my blog to earn money from my ads. Please do NOT share my graph photo this includes in Facebook groups, or save to Pinterest. Doing so, would allow makers to not have to return to my blog, which would result in a loss of views and income.
You’ll need 149 beads for this Letter Q.
After letter is set, place parchment paper on top (waxiest side face down), and iron in a circular motion for 15-20 seconds, or as needed to fuse all beads. Flip over (be careful, may be hot), replace parchment paper, and iron in a circular motion for 15-20 seconds, or as needed to fuse all beads. Peel off paper, and allow to cool.
“Q” Video Tutorial:
“R” Graph:
As a blogger, I rely on views to my blog to earn money from my ads. Please do NOT share my graph photo this includes in Facebook groups, or save to Pinterest. Doing so, would allow makers to not have to return to my blog, which would result in a loss of views and income.
You’ll need 177 beads for this Letter R.
After letter is set, place parchment paper on top (waxiest side face down), and iron in a circular motion for 15-20 seconds, or as needed to fuse all beads. Flip over (be careful, may be hot), replace parchment paper, and iron in a circular motion for 15-20 seconds, or as needed to fuse all beads. Peel off paper, and allow to cool.
“R” Video Tutorial:
“S” Graph:
As a blogger, I rely on views to my blog to earn money from my ads. Please do NOT share my graph photo this includes in Facebook groups, or save to Pinterest. Doing so, would allow makers to not have to return to my blog, which would result in a loss of views and income.
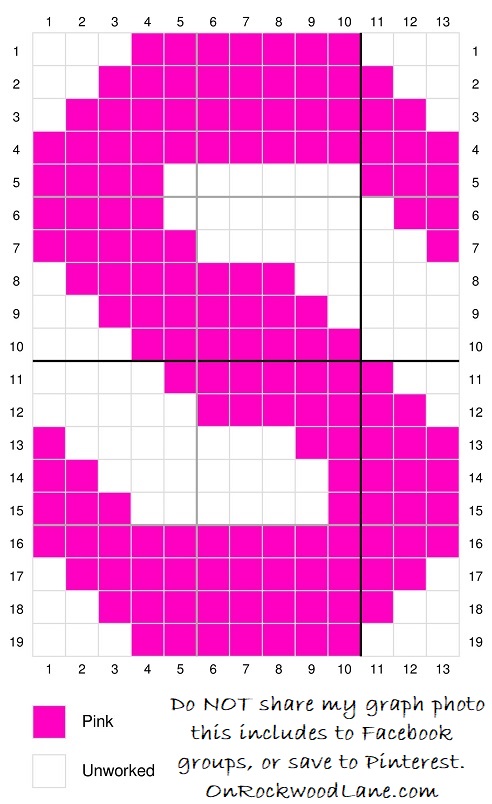
You’ll need 153 beads for this Letter S.
After letter is set, place parchment paper on top (waxiest side face down), and iron in a circular motion for 15-20 seconds, or as needed to fuse all beads. Flip over (be careful, may be hot), replace parchment paper, and iron in a circular motion for 15-20 seconds, or as needed to fuse all beads. Peel off paper, and allow to cool.
“S” Video Tutorial:
“T” Graph:
As a blogger, I rely on views to my blog to earn money from my ads. Please do NOT share my graph photo this includes in Facebook groups, or save to Pinterest. Doing so, would allow makers to not have to return to my blog, which would result in a loss of views and income.
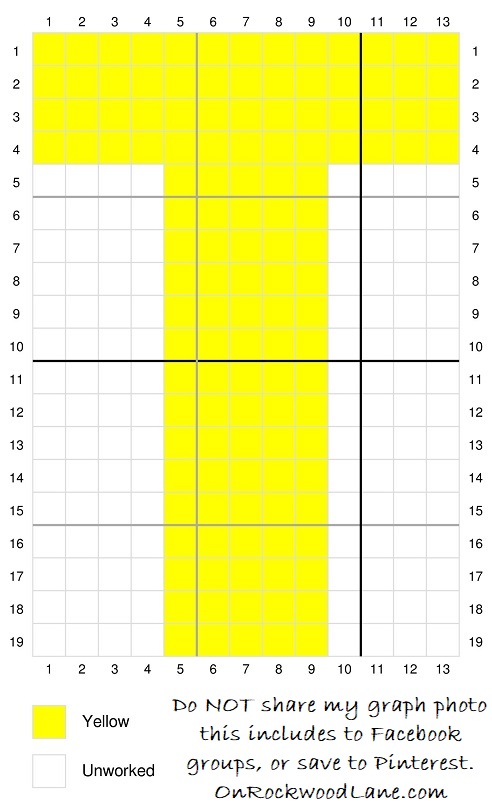
You’ll need 127 beads for this Letter T.
After letter is set, place parchment paper on top (waxiest side face down), and iron in a circular motion for 15-20 seconds, or as needed to fuse all beads. Flip over (be careful, may be hot), replace parchment paper, and iron in a circular motion for 15-20 seconds, or as needed to fuse all beads. Peel off paper, and allow to cool.
“T” Video Tutorial:
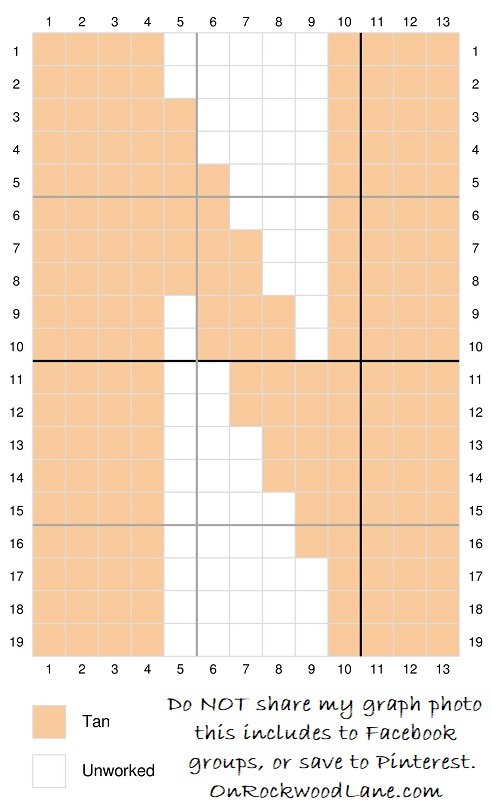
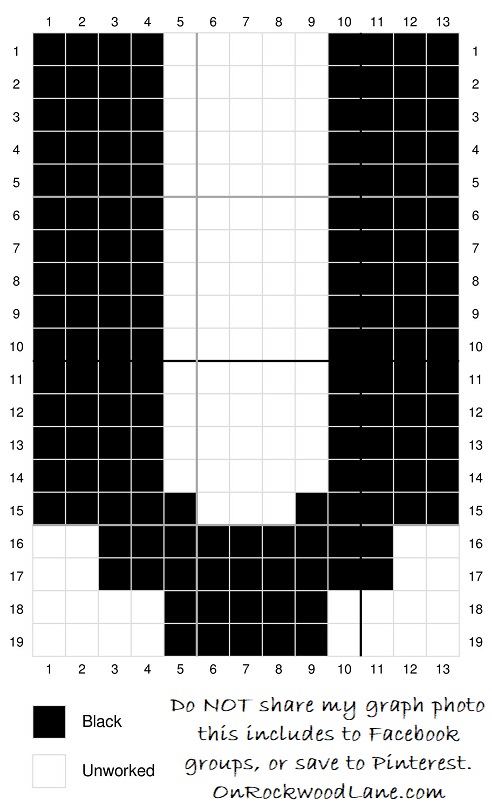
“U” Graph:
As a blogger, I rely on views to my blog to earn money from my ads. Please do NOT share my graph photo this includes in Facebook groups, or save to Pinterest. Doing so, would allow makers to not have to return to my blog, which would result in a loss of views and income.
You’ll need 166 beads for this Letter U.
After letter is set, place parchment paper on top (waxiest side face down), and iron in a circular motion for 15-20 seconds, or as needed to fuse all beads. Flip over (be careful, may be hot), replace parchment paper, and iron in a circular motion for 15-20 seconds, or as needed to fuse all beads. Peel off paper, and allow to cool.
“U” Video Tutorial:
“V” Graph:
As a blogger, I rely on views to my blog to earn money from my ads. Please do NOT share my graph photo this includes in Facebook groups, or save to Pinterest. Doing so, would allow makers to not have to return to my blog, which would result in a loss of views and income.
You’ll need 150 beads for this Letter V.
After letter is set, place parchment paper on top (waxiest side face down), and iron in a circular motion for 15-20 seconds, or as needed to fuse all beads. Flip over (be careful, may be hot), replace parchment paper, and iron in a circular motion for 15-20 seconds, or as needed to fuse all beads. Peel off paper, and allow to cool.
“V” Video Tutorial:
“W” Graph:
As a blogger, I rely on views to my blog to earn money from my ads. Please do NOT share my graph photo this includes in Facebook groups, or save to Pinterest. Doing so, would allow makers to not have to return to my blog, which would result in a loss of views and income.
You’ll need 177 beads for this Letter W.
After letter is set, place parchment paper on top (waxiest side face down), and iron in a circular motion for 15-20 seconds, or as needed to fuse all beads. Flip over (be careful, may be hot), replace parchment paper, and iron in a circular motion for 15-20 seconds, or as needed to fuse all beads. Peel off paper, and allow to cool.
“W” Video Tutorial:
“X” Graph:
As a blogger, I rely on views to my blog to earn money from my ads. Please do NOT share my graph photo this includes in Facebook groups, or save to Pinterest. Doing so, would allow makers to not have to return to my blog, which would result in a loss of views and income.
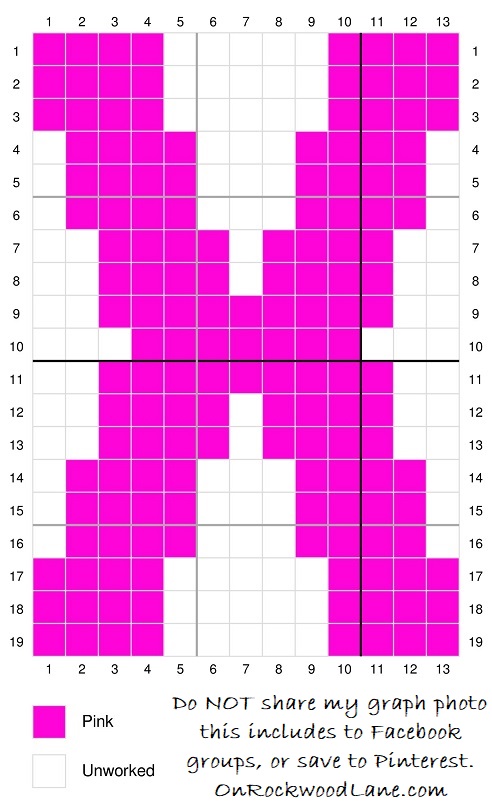
You’ll need 153 beads for this Letter X.
After letter is set, place parchment paper on top (waxiest side face down), and iron in a circular motion for 15-20 seconds, or as needed to fuse all beads. Flip over (be careful, may be hot), replace parchment paper, and iron in a circular motion for 15-20 seconds, or as needed to fuse all beads. Peel off paper, and allow to cool.
“X” Video Tutorial:
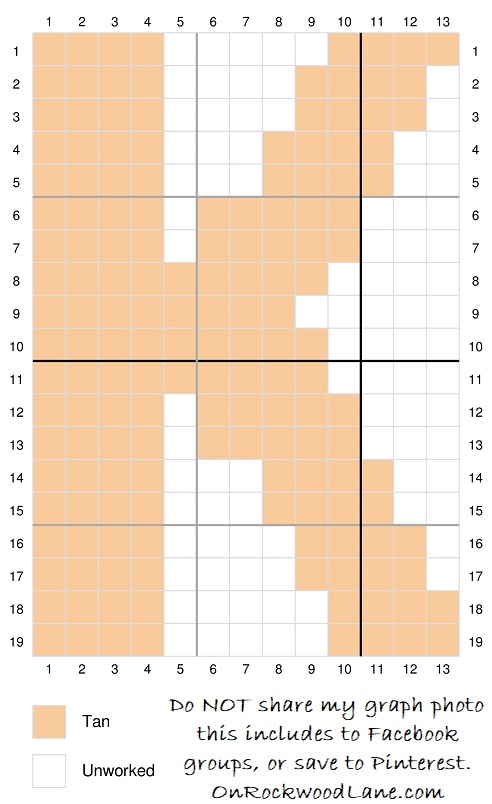
“Y” Graph:
As a blogger, I rely on views to my blog to earn money from my ads. Please do NOT share my graph photo this includes in Facebook groups, or save to Pinterest. Doing so, would allow makers to not have to return to my blog, which would result in a loss of views and income.
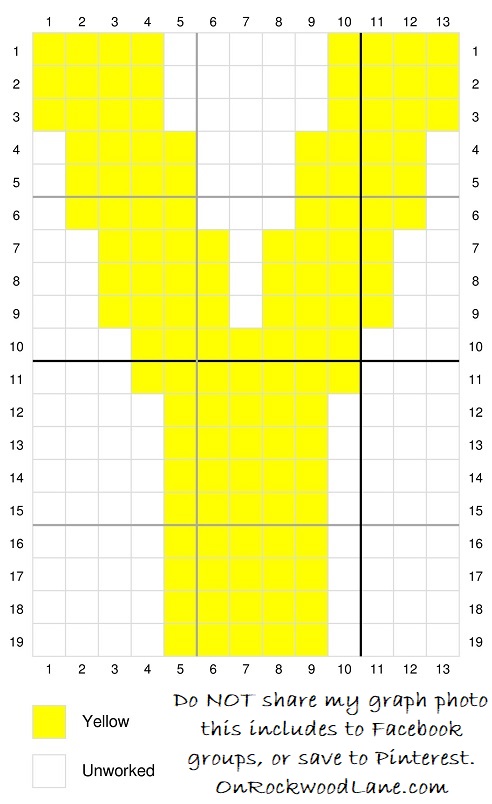
You’ll need 126 beads for this Letter Y.
After letter is set, place parchment paper on top (waxiest side face down), and iron in a circular motion for 15-20 seconds, or as needed to fuse all beads. Flip over (be careful, may be hot), replace parchment paper, and iron in a circular motion for 15-20 seconds, or as needed to fuse all beads. Peel off paper, and allow to cool.
“Y” Video Tutorial:
“Z” Graph:
As a blogger, I rely on views to my blog to earn money from my ads. Please do NOT share my graph photo this includes in Facebook groups, or save to Pinterest. Doing so, would allow makers to not have to return to my blog, which would result in a loss of views and income.
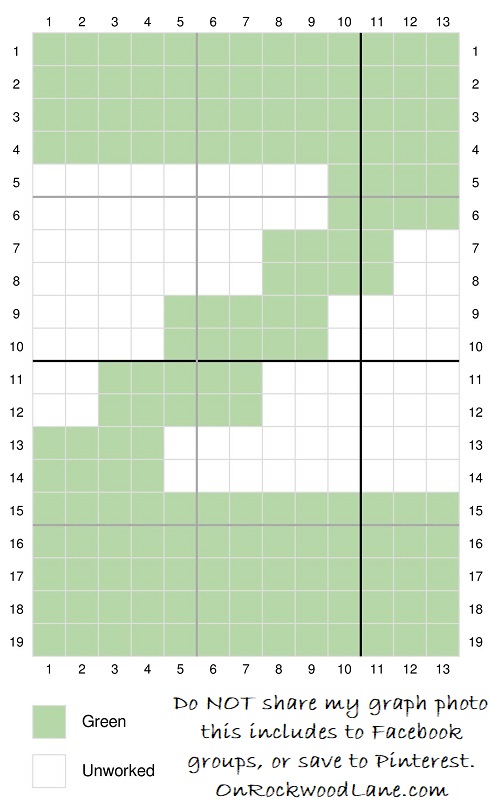
You’ll need 161 beads for this Letter Z.
After letter is set, place parchment paper on top (waxiest side face down), and iron in a circular motion for 15-20 seconds, or as needed to fuse all beads. Flip over (be careful, may be hot), replace parchment paper, and iron in a circular motion for 15-20 seconds, or as needed to fuse all beads. Peel off paper, and allow to cool.
“Z” Video Tutorial:

Feel free to use this information to make and sell your own items. When sharing, designer credit is appreciated, but not required. All On Rockwood Lane Patterns, Recipes, Posts, Photos and PDF’s are protected under copyright. They are not to be copied, distributed or sold – doing so is copyright infringement and stealing! DO NOT copy and paste my pattern anywhere, and DO NOT share the written pattern with others, share the link to the pattern instead so others can find it themselves.
Join one of our awesome Facebook groups to share your creations, and see what others are up to!
– Yarn Crafts & Coffee Community
– DIY Home On Rockwood Lane
– Alexandra Lane Lifestyle
Linked Up To…
Craft Schooling Sunday – Creative Jewish Mom
Happiness is Homemade Link Party – Decor Craft Design
You’re the Star Blog Hop – Decor Craft Design
Sundays on Silverado #120 – The House on Silverado
Share the Wealth Link Up #31 – Big Fat Menopausal Life
Anything Goes Linky #356 – My Random Musings
Handmade Monday #304 – Sum of their Stories
The Really Crafty Link Party #341 – Keeping it Real
Craftastic Monday Link Party – Sew Can Do
You’re the Star Blog Hop – Decor Craft Design
Hello Monday – Pink Lady
664th Inspire Me Tuesday – A Stroll Thru Life
Fabulous Party 452 – Lou Lou Girls
Talent Sharing Tuesday – Scribbling Boomer
The Happy Now Blog Link- Up #349 – JENerally Informed
Link Party 479 – Oombawka Design Crochet
Team Creative Crafts Link Party #122 – Artsy-Fartsy Mama
Wonderful Wednesday – Oh My Heartsie Girl
Wednesday Link Party #324 – To Grandma’s House We Go
Thursday Favorite Things #568 – An Artful Mom
Creatively Crafty Link Party #356 – Try It – Like It – Create It
Encouraging Hearts and Home Blog Hop – My Slices of Life
Grace at Home No. 488 – Imparting Grace
Crafty Creators Link Party #45 – Life as a LEO Wife
Create, Bake, Grow & Gather Party #548 – Shabby Art Boutique
Funtastic Friday Link Party #413 – Simply Beautiful by Angela
A Morning Cup of Joe – The Cottage Market
Pink Saturday – How Sweet the Sound
Thanks for sharing. Have a great day!
xoxo
Lovely
http://www.mynameislovely.com
Thank YOU!
Love this so much, a new reason to find my perler beads! thanks for sharing this and of course your wonderful crochet projects, on craft schooling sunday!
Indeed! They’re so fun!
These are all great, my kids loved these beads when they were younger and would have loved making their names.
I love that! So many fun things to do with kids.
How fun! I love seeing how you made these!
Jill – Doused in Pink
Thanks so much, Jill!
These are great! Thanks for sharing! I will definitely be sharing with my kids!
Aww, yes – so fun to do with kids!
I’ve never heard of these before but they look so cool! Thank you for all the patterns and the helpful tips too. They would be such a fun craft to do with the littles or to give as gifts as well. Hope you have the best day, CoCo
Definitely! They are so much fun to work with 🙂