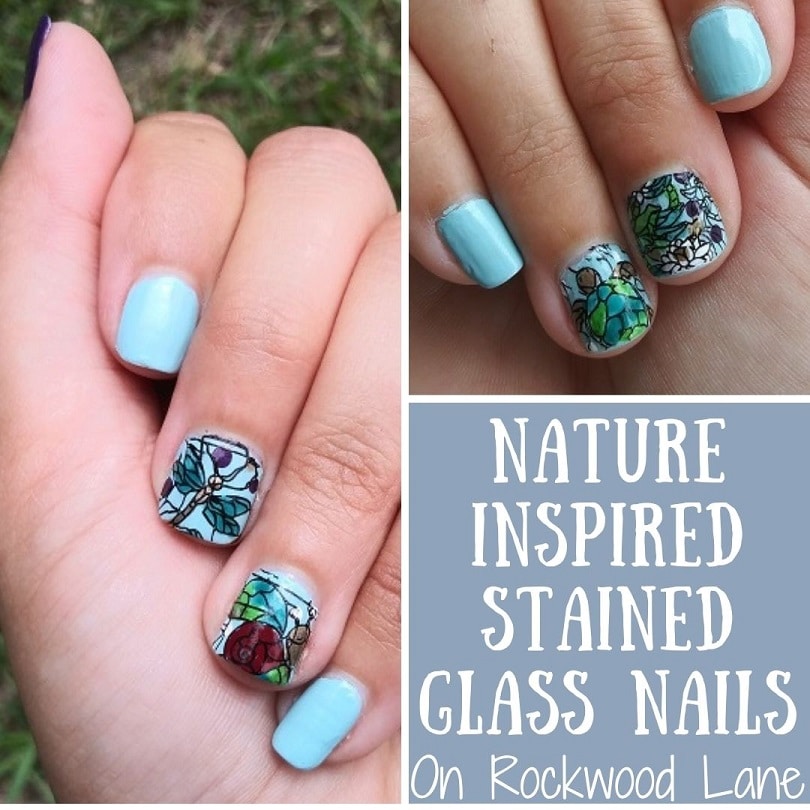
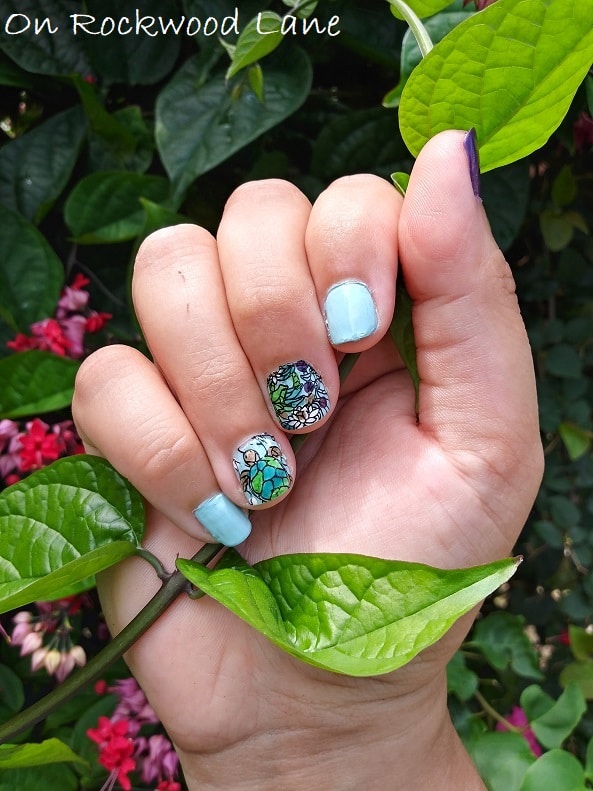
How to paint nature inspired stained glass nails using stamping plates including a dragonfly, a snail, a turtle and a frog.
This post contains affiliate links for Maniology. If you make a purchase by clicking on them, I make a small commission at no extra cost to you. Thanks for your support!
When I was a teenager, I used to spend a lot of time working on my nails. I used to bite my nails horribly until I started working at 14, and then for whatever reason, I stopped biting them, and let them grow beautifully. I would sit with all my polishes out, glitters, and toothpicks. Back then, I did all of my designs with a toothpick. Wish I could go back, and tell myself how great dotting tools are. Haha!
Some years later, I was so overwhelmed with work and school that I got out of doing them, and went back and forth with biting and acrylics. Anytime I would try to paint my nails, I found myself impatient, and disappointed. The polish would be messy, or I wouldn’t sit long enough to let them dry and they would get all those imprints, and then…
I found Color Street! If you’re not familiar, it’s 100% real nail polish, but in nail strip form. Super easy to use, and no dry time! I was hooked, and used the heck out of them, but then I was noticing even with the amazing Nail Envy by OPI, it was just too heavy on my nails so I had to stop using it, and then I saw an advertisement on Facebook for Maniology! Perfect timing!
This is my first Mani x Me subscription box from Maniology, and my first experience with nail stamping. I used to be intimidated by the idea, but once I finally sat down, and tried it, I had so much fun with it!
I gathered all my supplies and polishes, turned on my iHeart radio, and sat outside on the porch to work. It was so relaxing. I had no issues waiting for my polish to dry, and even though I had to redo my first two stamped designs over, I found myself so relaxed, and just enjoying the moment. I can’t wait to open my next Mani x Me box, and play around with the new plates and polishes.
Saved this to Your Favorites On (sub 07/11):
FaveCrafts, Cheap Thrifty Living, DIYideaCenter, AllFreeHolidayCrafts
Materials I Used – use code ROCKWOOD10 at check out on Maniology site for 10% off:
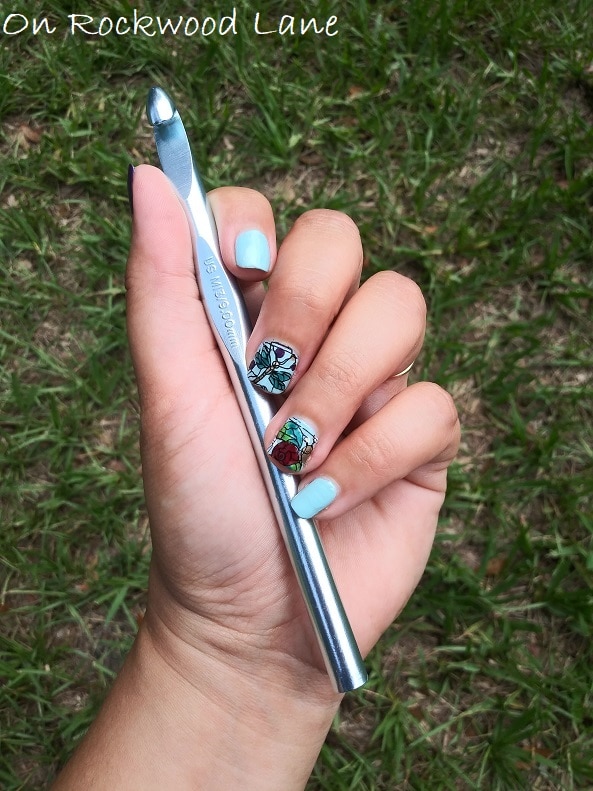
- Maniology MXM055 Stamping Plate from the May 2021 Mani x Me Subscription Box (exclusive to the box)
- Maniology Stamping Polish in Shattered (dark purple), Glass (sheer teal), Bam! White and Straight Up Black [use code ROCKWOOD10 at check out for 10% off]
- LA Colors Nail Polish in Craze 7 Batch 23589 (light blue as my nail base)
- Sinful Colors Nail Polish in Gold Metal, Happy Ending
- Sally Hansen Miracle Gel Nail Polish in Dig Fig
- Small Tip Dotting Tool
- Maniology Smudge-Free Water Based Top Coat
- OPI Nail Envy Clear Coat
- Ice Cube Clear Rectangular Stamper – I have two
- Maniology Speed Dry Top Coat
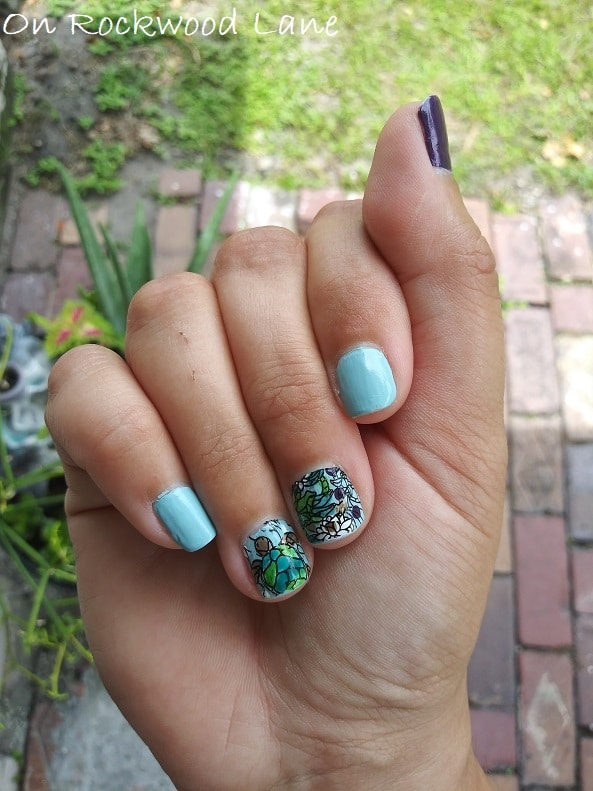
About Shattered and Glass Stamping Polishes
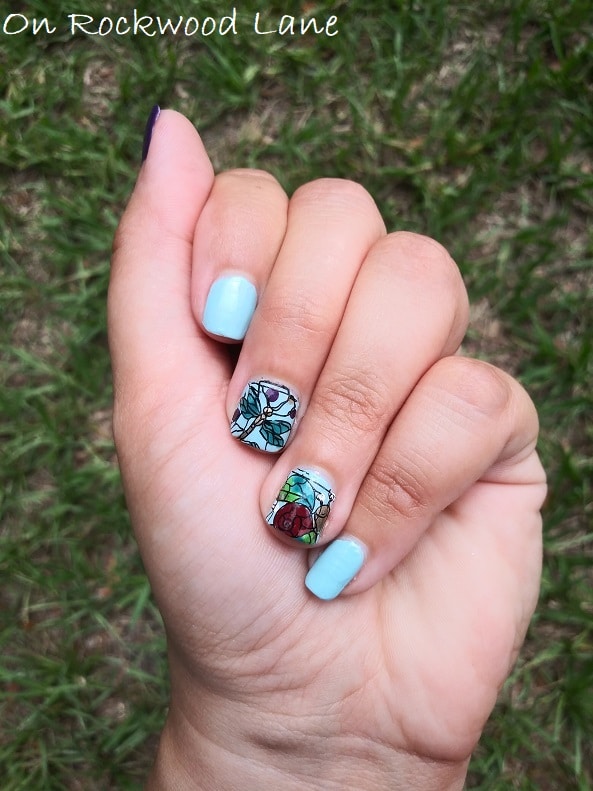
My first thoughts on the teal [Glass] was that it was too dark and opaque for coloring with, but when I grabbed some, I realized it really was just like looking through teal stained glass! It’s a gorgeous sheer teal tinted polish perfect for coloring in the designs. I used it on the dragonfly wings, and mixed it in on the greenery with a green I had.
The purple polish [Shattered] is very dark. I used it on my thumbs, and made some dots around each of my designs just to add a little extra. I was so surprised on my thumbs that it only required one coat – that’s excellent quality! I will say though, and it may just be my nails being extra sensitive, but it’s also a heavier polish than the rest. The light blue on the rest of my nails is 2 coats, and it still feels lighter on my fingers than one of the Shattered, then again, it is a stamping polish.
How I Did My Stained Glass Nails
First thing I did was use my OPI Nail Envy as a base coat. This clear coat has saved my nails that used to be brittle and peel from using nail polishes. It’s excellent!
Next, I painted all of my nails with the LA Colors light blue color – even the thumbs that you see purple. I tried to stamp on my thumbs, and wasn’t happy with it, so I took the polish off, and ended up changing them to the Maniology Shattered color.
I placed Maniology Straight Up Black on my stamping plate, scraped it, and picked up my desired designs. I have two stampers, so I did two designs at a time. After picking up my designs, I used a small dotting tool to dip it into the color I wanted, and filled in the spaces on my stampers.
I waited just a couple minutes so it was a little tacky still, and then stamped on my nails. By the time I was done painting, I only had to wait for the latest color to dry enough to stamp as the others dried quickly.
I covered my stamped nails with Maniology’s Smudge-Free Top Coat so when I did my final clear coat, these stamped designs wouldn’t run, and then I used Maniology’s Speed Dry Top Coat to finish my nails off.
Join one of my awesome Facebook groups to share your creations, and see what others are up to!
– EyeLoveKnots Crochet & DIY Community
– DIY Home On Rockwood Lane
– Alexandra Lane Lifestyle
Linked Up To…
The Sunday Showcase – Chez Mireille
Weekday Wear Link Up – Away from the Blue
Style with a Smile – Style Splash
Confident Twosday Linkup – I do deClaire
Style Six – The Queen in Between
Style on the Daily Linkup – Straight A Style
Thursday Fashion Files Link Up #313 – Curly Crafty Mom
Chic and Stylish Linkup – Mummabstylish
Fancy Friday Linkup – Nancy’s Fashion Style
The Neverending Style link-up – The Grey Brunette
Unlimited Link Party 29 – Grammy’s Grid
You’re the Star Blog Hop – Decor Craft Design
Happiness is Homemade Link Party #382 – Decor Craft Design
Craft Schooling Sunday – Creative Jewish Mom
Craftastic Monday Link Party – Sew Can Do
The Really Crafty Link Party #274 – Keeping it Real
Handmade Monday #235 – Sum of their Stories
Hearth and Soul Link Party – April, the 21st Century Housewife
596th Inspire Me Tuesday – A Stroll Thru Life
Fabulous Party 379 – Lou Lou Girls
Party in Your PJs #366 – The Apple Street Cottage
{Wow Me} Wednesday #512 – Ginger Snap Crafts
Your Whims Wednesday #519 – My Girlish Whims
The Wednesday Link Party 406 – Oombawka Design Crochet
Creative Crafts Linky Party #49 – Creatively Beth
Wonderful Wednesday – My Crafty Zoo
Thursday Favorite Things #497 – An Artful Mom
Creatively Crafty Link Party #283 – Life Beyond the Kitchen
Artsy-Fartsy Mama #352 – Artsy-Fartsy Mama
Encouraging Hearts and Home Blog Hop – Scratch Made Food
Grace at Home No 429 – Imparting Grace
Friday Favorites – Busy Being Jennifer
Create, Bake, Grow & Gather Party #476 – Shabby Art Boutique
Funtastic Friday Link Party #340 – Simply Beautiful by Angela
Link Your Stuff – Annemarie’s Haakblog
A Morning Cup of Joe – The Cottage Market
Saturday Sparks Link Party 430 – Pieced Pastimes
Style Link Up – Lizzie in Lace
What a beautiful design! I like how colourful it is and that blue base is a great one! 🙂
Hope your week is going well 🙂
Thanks so much!
Your nails are beautiful! I still paint my nails often (though I use a lot of Color Street too!). I had all sorts of hand painted designs and nails stickers/ gems that I used when I was in high school.
I love to hear that! I do love the ease of using Color Street too.
They look so so pretty! A few years back my friend’s daughter use to practice doing designs on our nails: fun times and cute nails we have. Now, if I get a pedicure and nail polish on my toes twice a year, it is a big feat.
http://www.chezmireillefashiontravelmom.com
Hehe. Thank you, Mireille! If you were closer, I would happily paint your nails 🙂
Your nails look beautiful! I love having my nails done, but don’t want to spend the money at the saloon. I’ve never heard of this and need to look into it!
Thank you! Yes! I’ve been having so much fun with it, and watching nail stamping videos on YouTube and Instagram. I really like “Moonlit and Polished” on YouTube.
These are beautiful! I’m not one to fuss my nails very much but I do like it when they look nice. I had some nail art pens back in the day and always do fun nails for me and my daughter for occasions like Christmas and weddings. This stamping idea looks fun and the colours are great.
Thank you, Julie! Nail art pens are great too! I need to get a new set. So easy to use.